The Most Overkill Instagram Photo Grid Ever
Jesse Chen • February 27, 2022 • 12 min read
This is a a story of over-engineering at its finest — I just built the most overkill Instagram photo grid for fun.
If you’re an engineer, then you know this feel. Because my website is a side project and I have no obligations or deadlines to anybody else, it created the perfect environment to obsess over an excessively unnecessary and heavily optimized Instagram photo grid for a personal website that barely gets 100 hits a day. Maybe this will be more practical for your website!
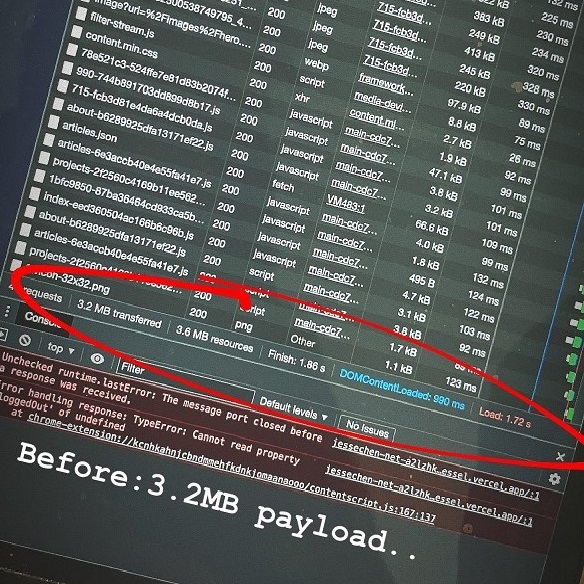
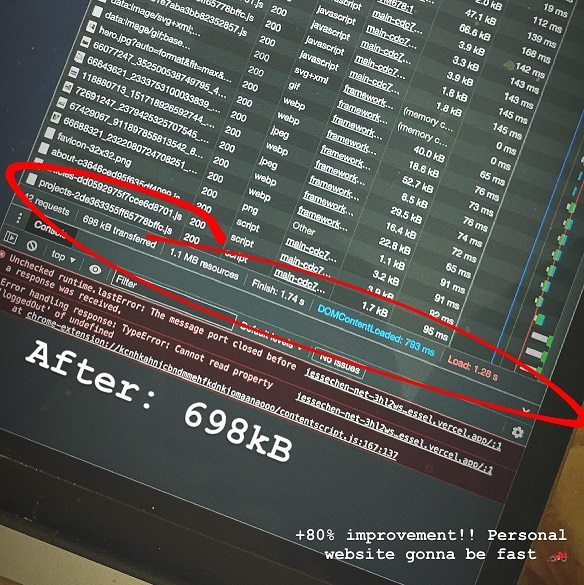
Now that the click bait title worked, my goal with this post is to actually share my learnings on optimizing web performance. This is the story of how I got my website from a 3.2MB behemoth down to a zippy 700kB payload by optimizing the heck out of the Instagram photo grid on my homepage.
Performance Concerns#
Problem: The IG Graph API returns image URLs that are way too large for thumbnails.

Considering the Instagram photo grid I want is a 3x3 grid of thumbnails, displaying 9 images would require us to download over 2MB just for thumbnails! To put this in context, the rest of my homepage resources add up to just 490kB.
For mobile phones or slower networks, downloading more bytes lead to longer loading times. In real-world applications, this can be the difference between a user that bounces from your site without interacting vs an engaged user.
This isn’t acceptable to someone who used to be one of the engineers responsible for the largest social network for photos (where every extra kB needed to load facebook.com lead to tens of thousands of lost user sessions, true story) 😛 So let’s fix the crap out of this.
Tech Stack#
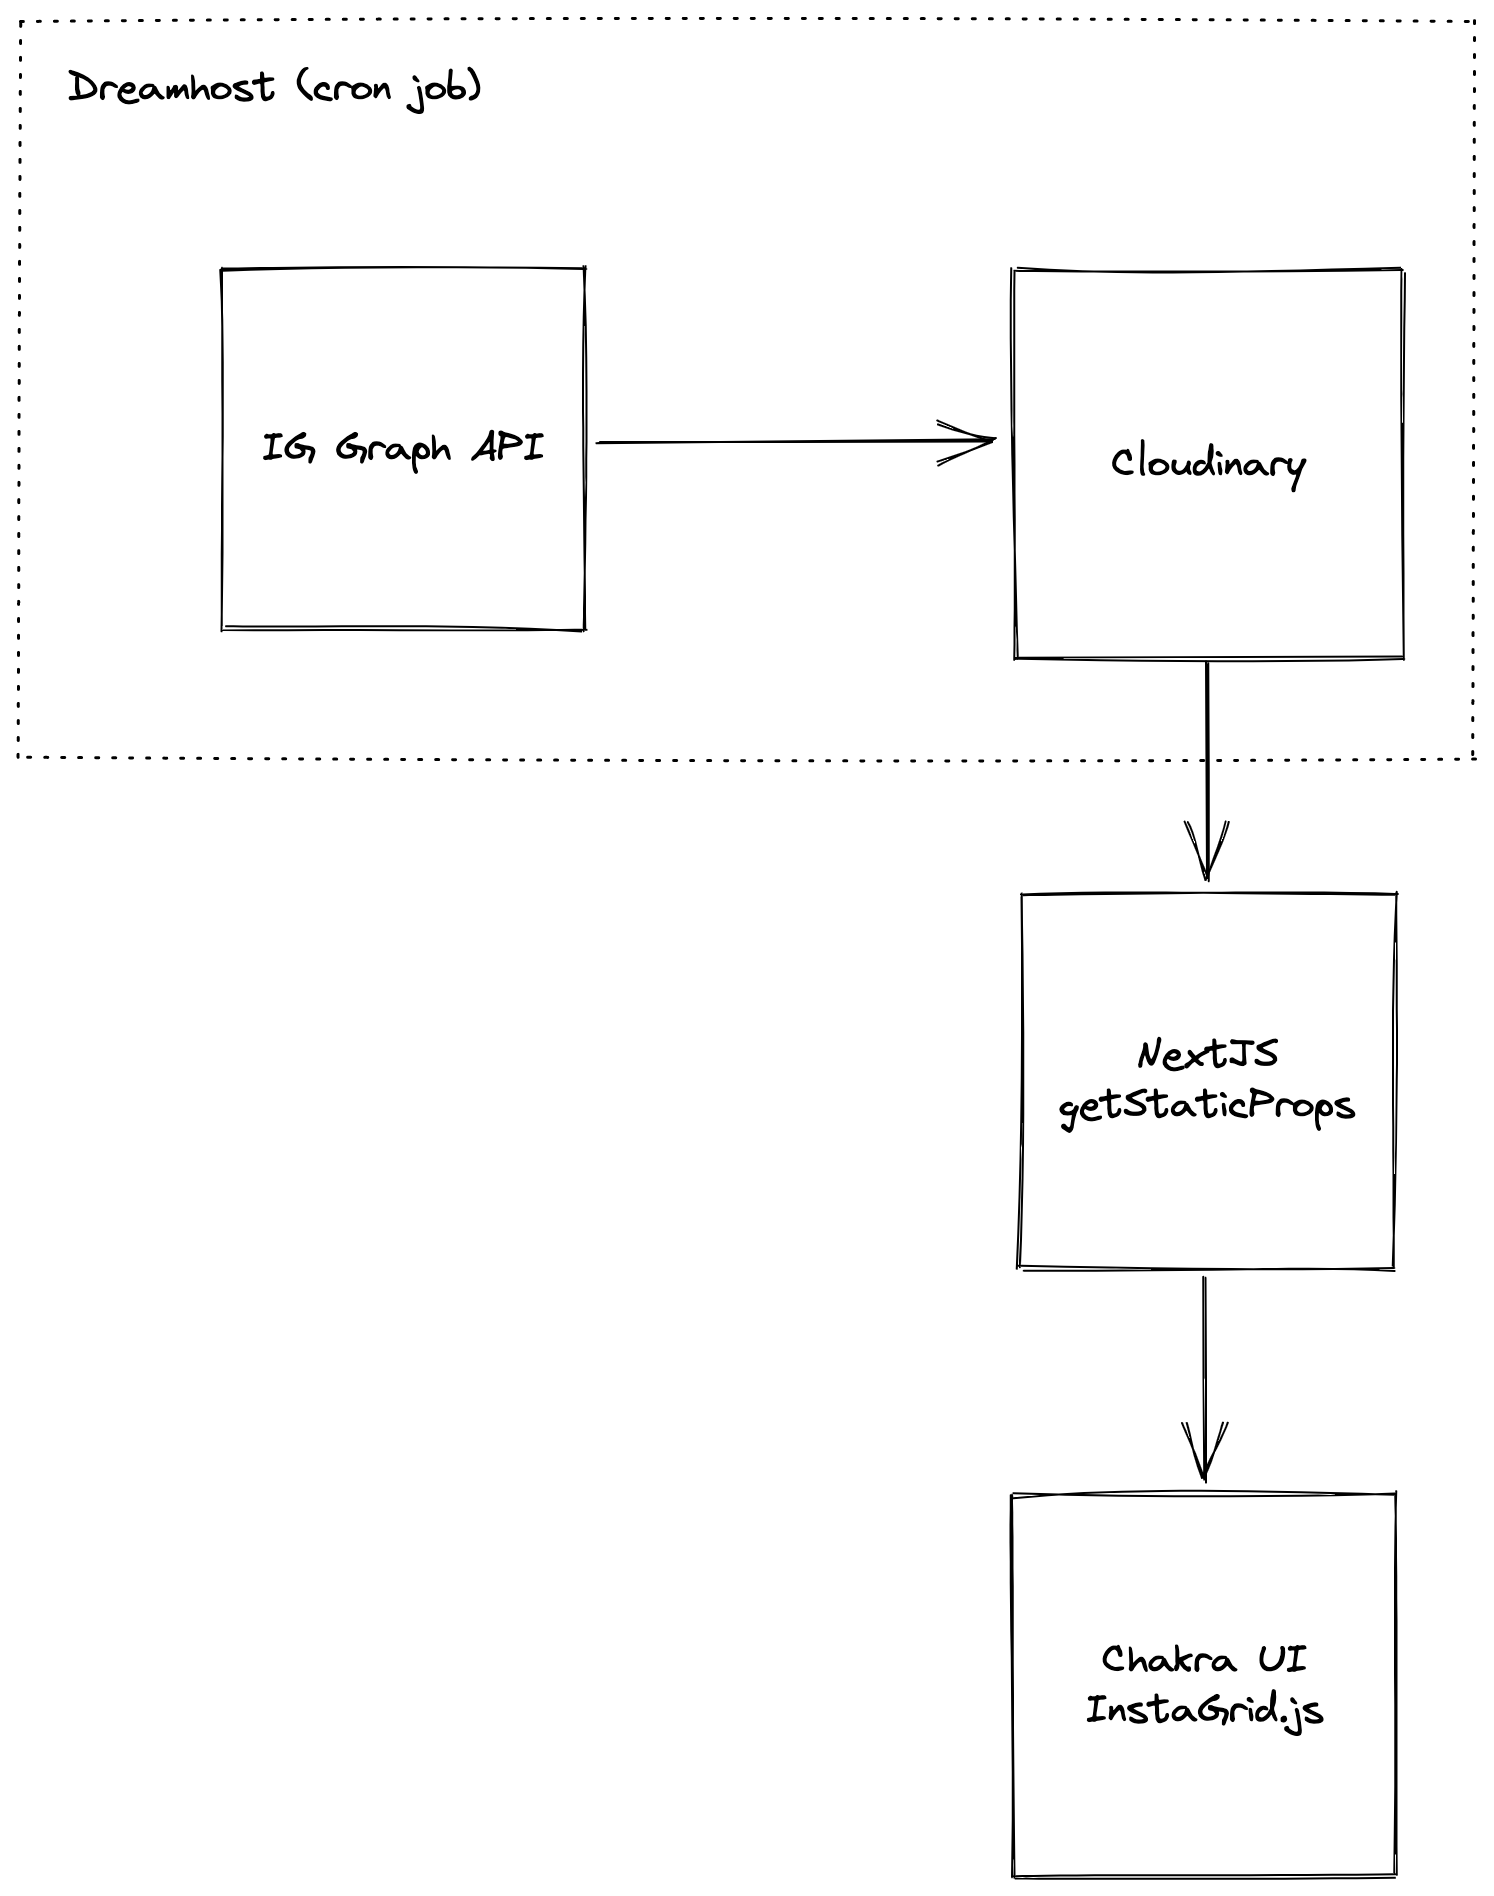
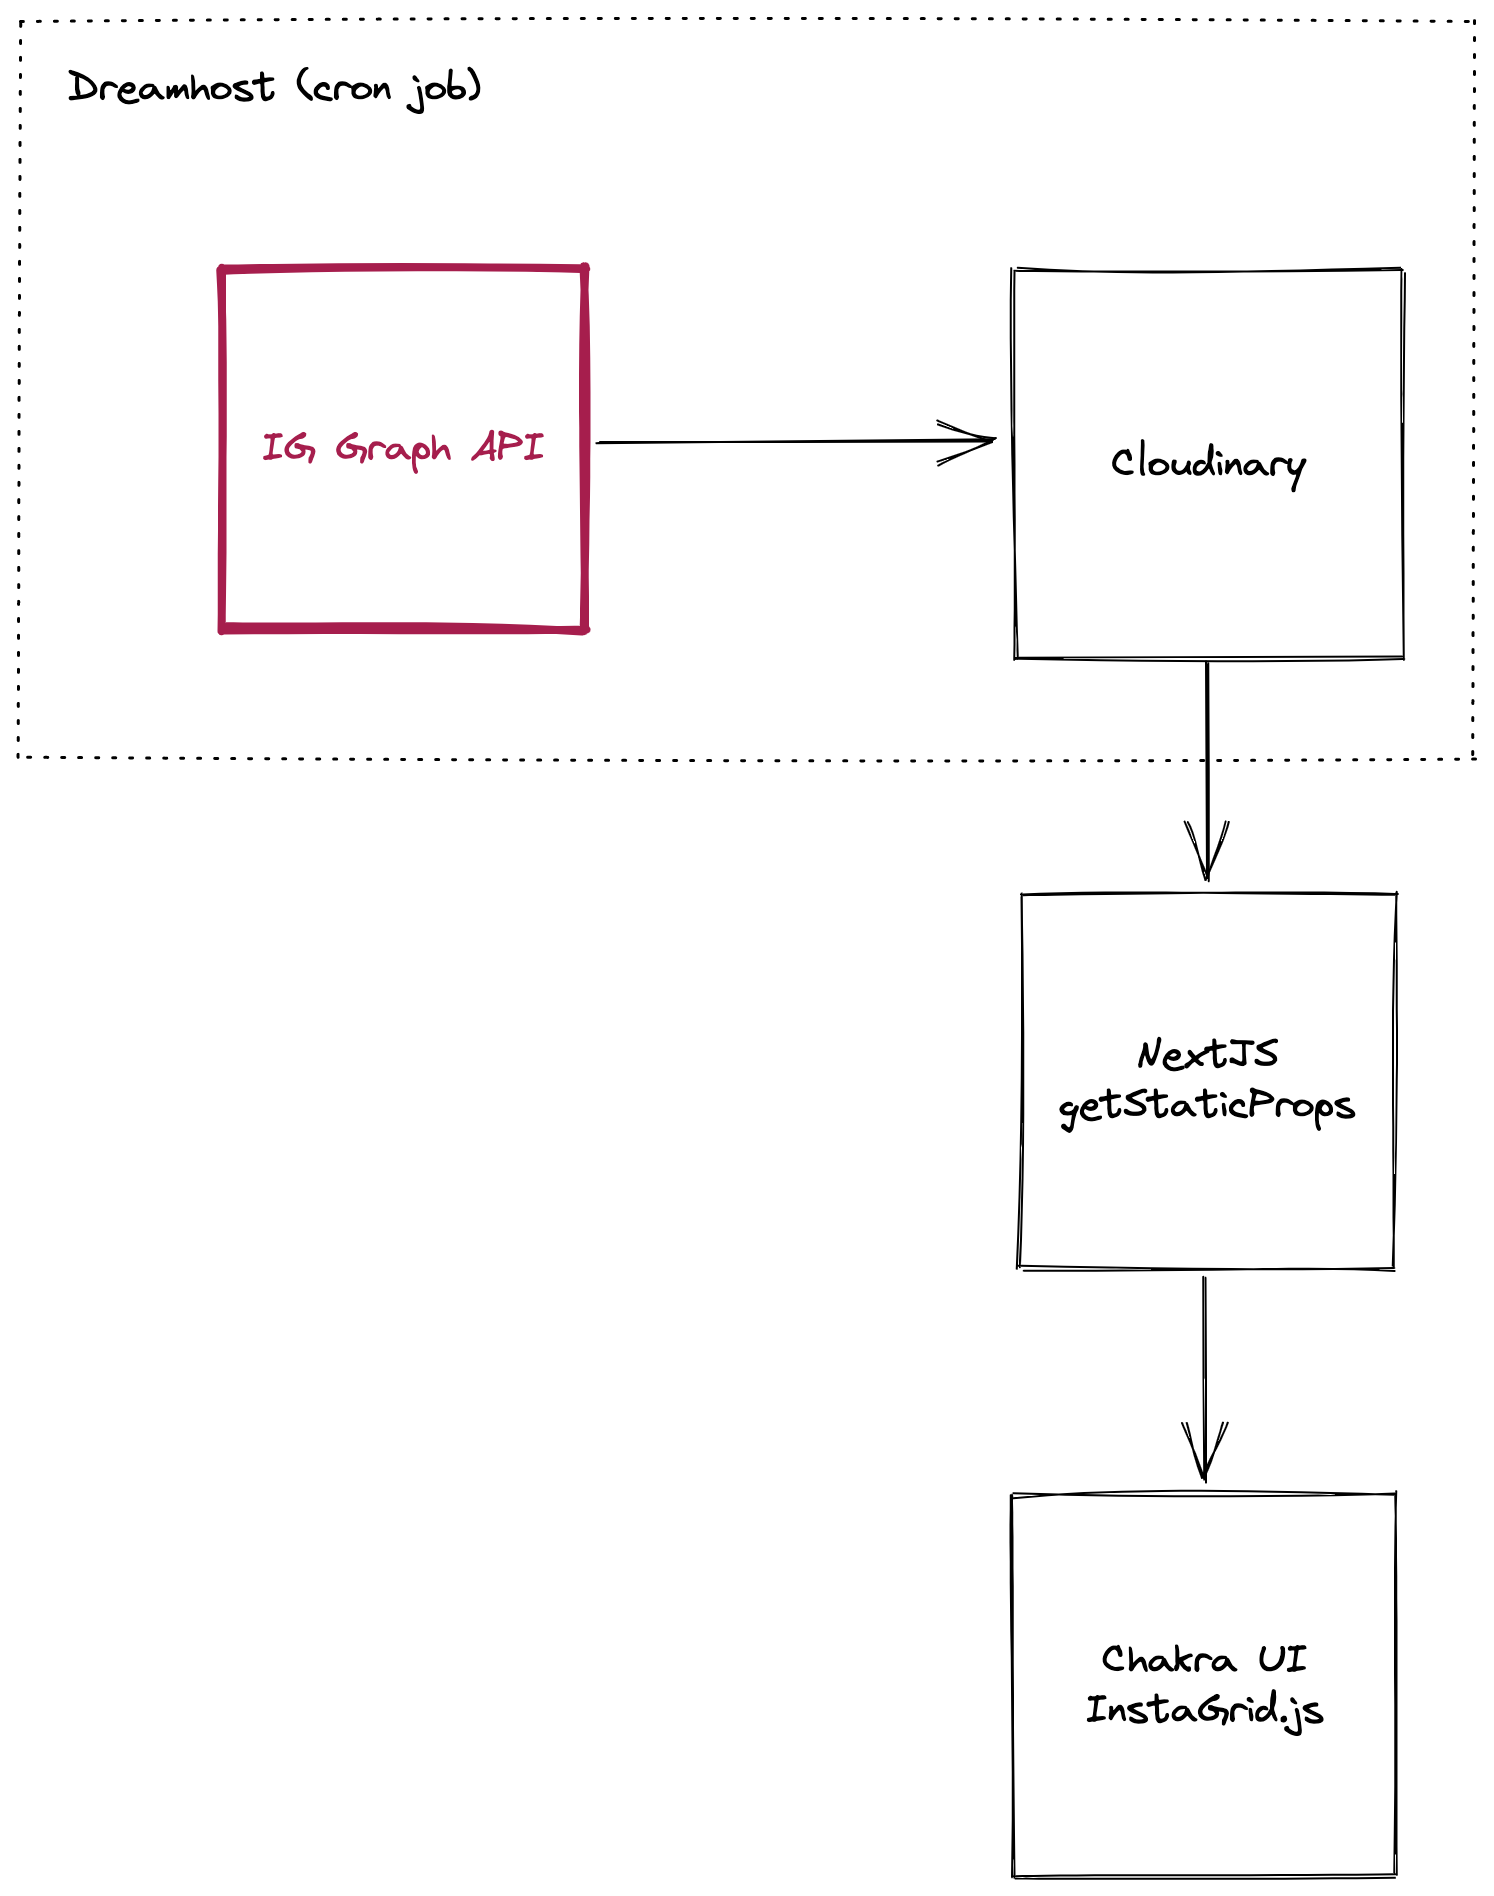
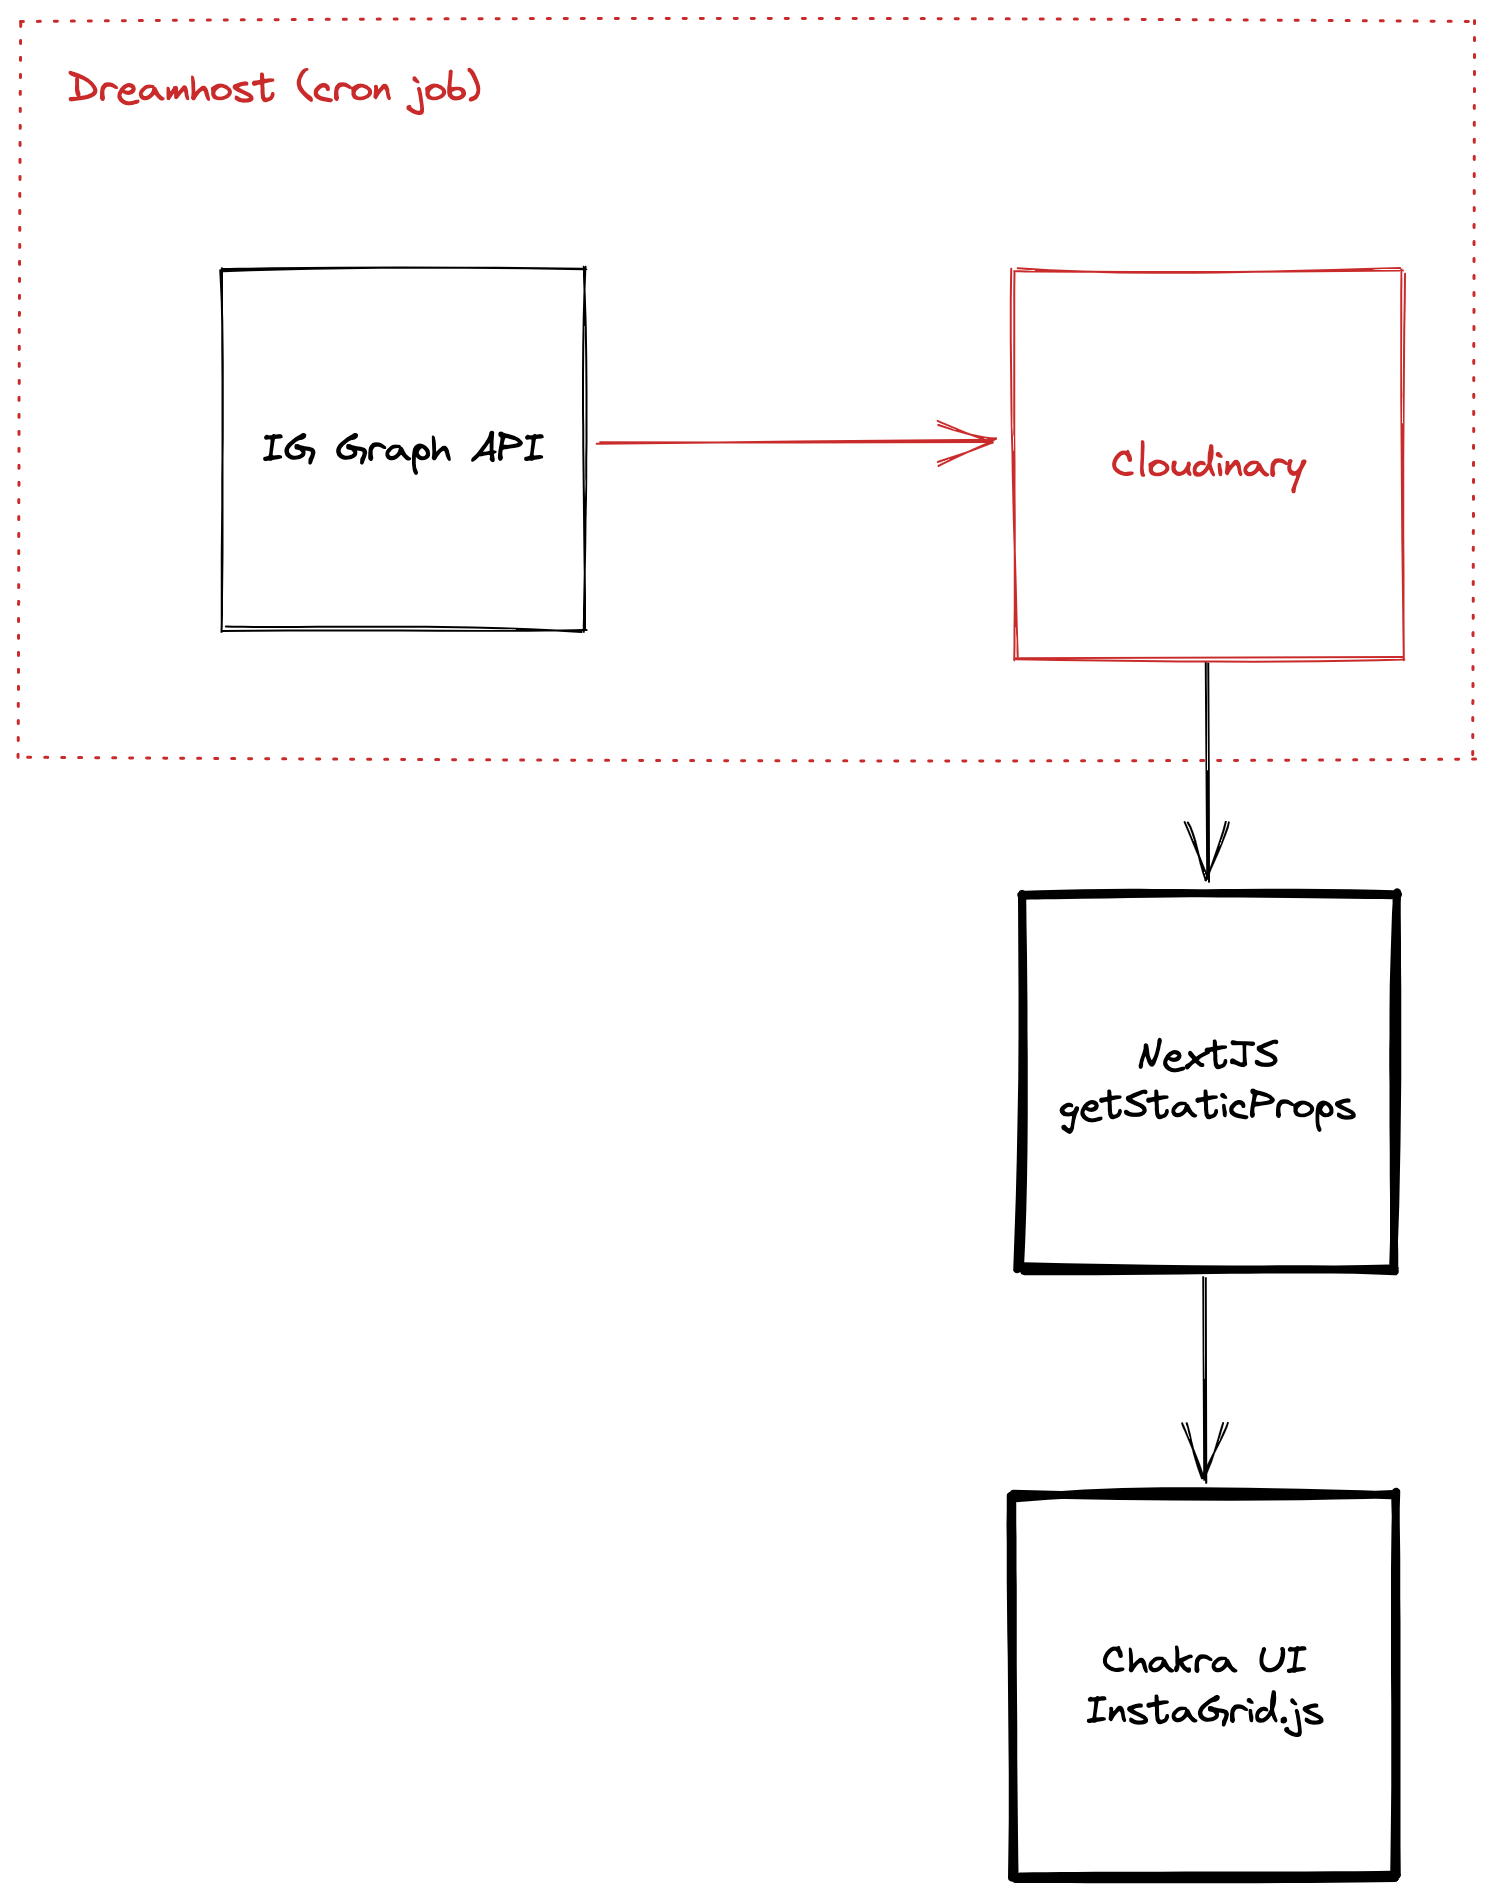
At a high level, my website is built with ReactJS, NextJS and Chakra UI on the frontend. Dreamhost and Cloudinary with IG’s Graph API on the backend. In this post, I’ll be walking through the implementation from the top down.
Using the built-in NextJS Image Optimization API#
My first reaction is to take advantage of NextJS Image Optimization API. NextJS advertises some pretty sweet optimizations if you use their next/image component to render images:
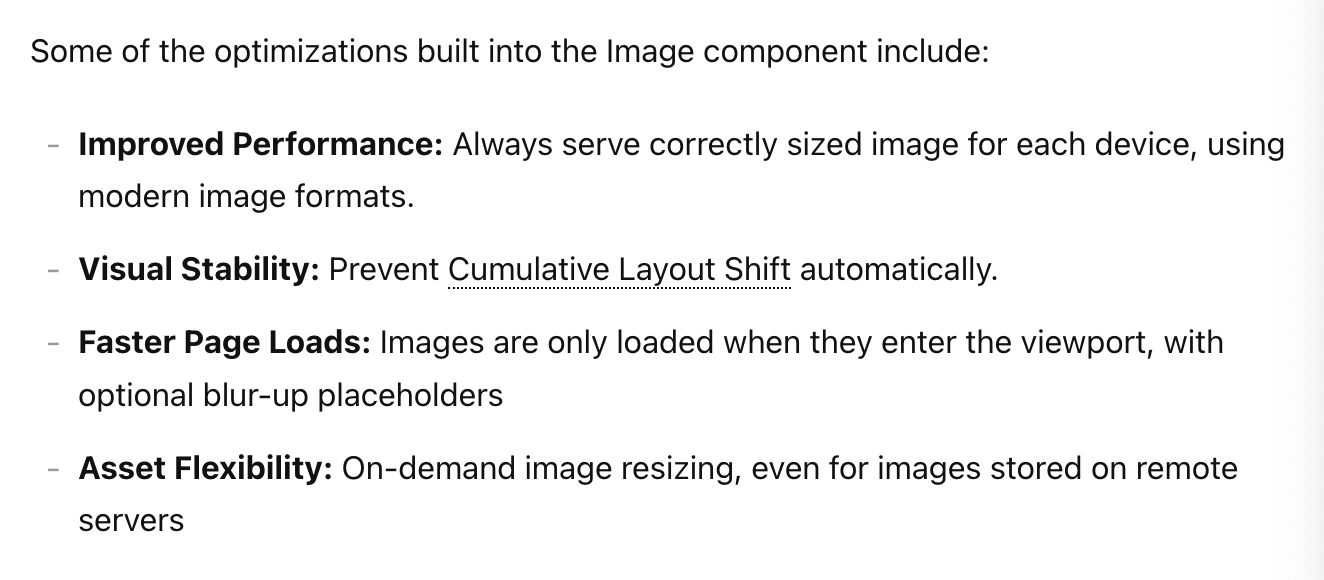
This sounds awesome and exactly what I need, but how do I leverage this with remote images served from the Graph API? The solution is to add a hardcoded allowlist of domains in your next.config.js file.
module.exports = {
  images: {
    domains: ['cdninstagram.com', 'scontent.cdninstagram.com'],
  },
}
Well, we have a problem. IG Graph API serve images from a lot of different subdomains. I noticed this when calling the API at different times that the URL would change and break when it came from a domain that wasn’t added to the config above. To share a few examples:

And this isn’t exhaustive! A hardcoded list of external domains cannot possibly enumerate all the possible CDNs that Instagram has/will have and so my thumbnails will not load for some regions.
The fix would be to allow for regex entries in domains to support all the possible *.cdninstagram.com subdomains. The right thing to do is probably to fix this in the core NextJS framework, but for now I’ve created an issue on their GitHub to build awareness. Maybe this will be fixed one day!
I needed to find an alternative approach.
Using Cloudinary instead#
My problem is twofold. The raw images from IG Graph API are too large, so I need a tool to resize and lower the quality of the images. I also need a non-Instagram CDN provider to serve the images so I can take advantage of NextJS’s next/image.
The solution is to use Cloudinary, a cloud-based image service provider. Cloudinary is a pretty awesome service that allow you to transform (e.g. crop, rotate) and deliver your images via their CDN. Cloudinary has a free tier which works perfectly fine for my site.
NextJS allows you to use other image service providers via their loader configuration. If I can figure out how to ingest Instagram images into Cloudinary, and use Cloudinary to transform them into lower-quality/smaller thumbnails to serve on my NextJS website — then it should all work. Let’s build.
Setup Instagram Graph API#
First step, I need to hit the official User Media API endpoint to fetch my last 9 photo/videos. The URL to get the thumbnail images of the last 9 media from a user is https://graph.instagram.com/{user_id}/media?fields=media_type%2Cmedia_url%2Cpermalink%2Cthumbnail_url&limit=9&access_token={access_token}. You will need to figure out your user_id and access_token next.
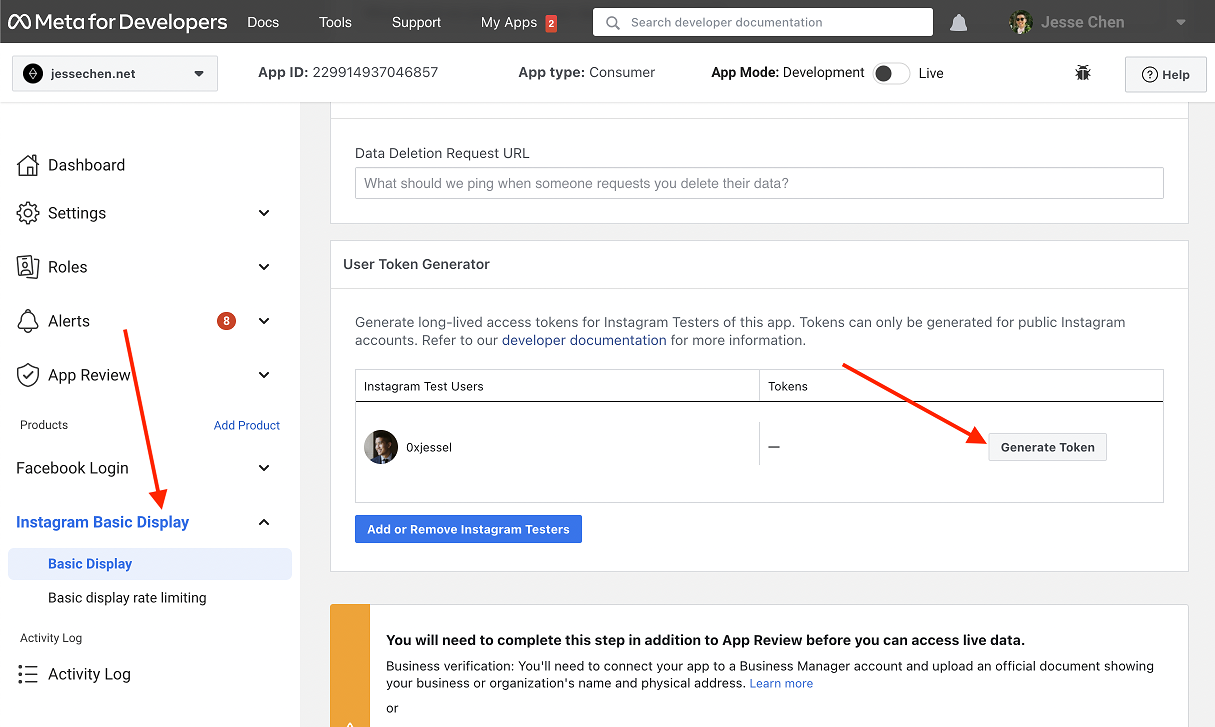
To get your own access token, you will have to create a new Consumer App. Afterwards, add the Instagram Basic Display product to your app, navigate to that product and click Generate Token to get your access token.
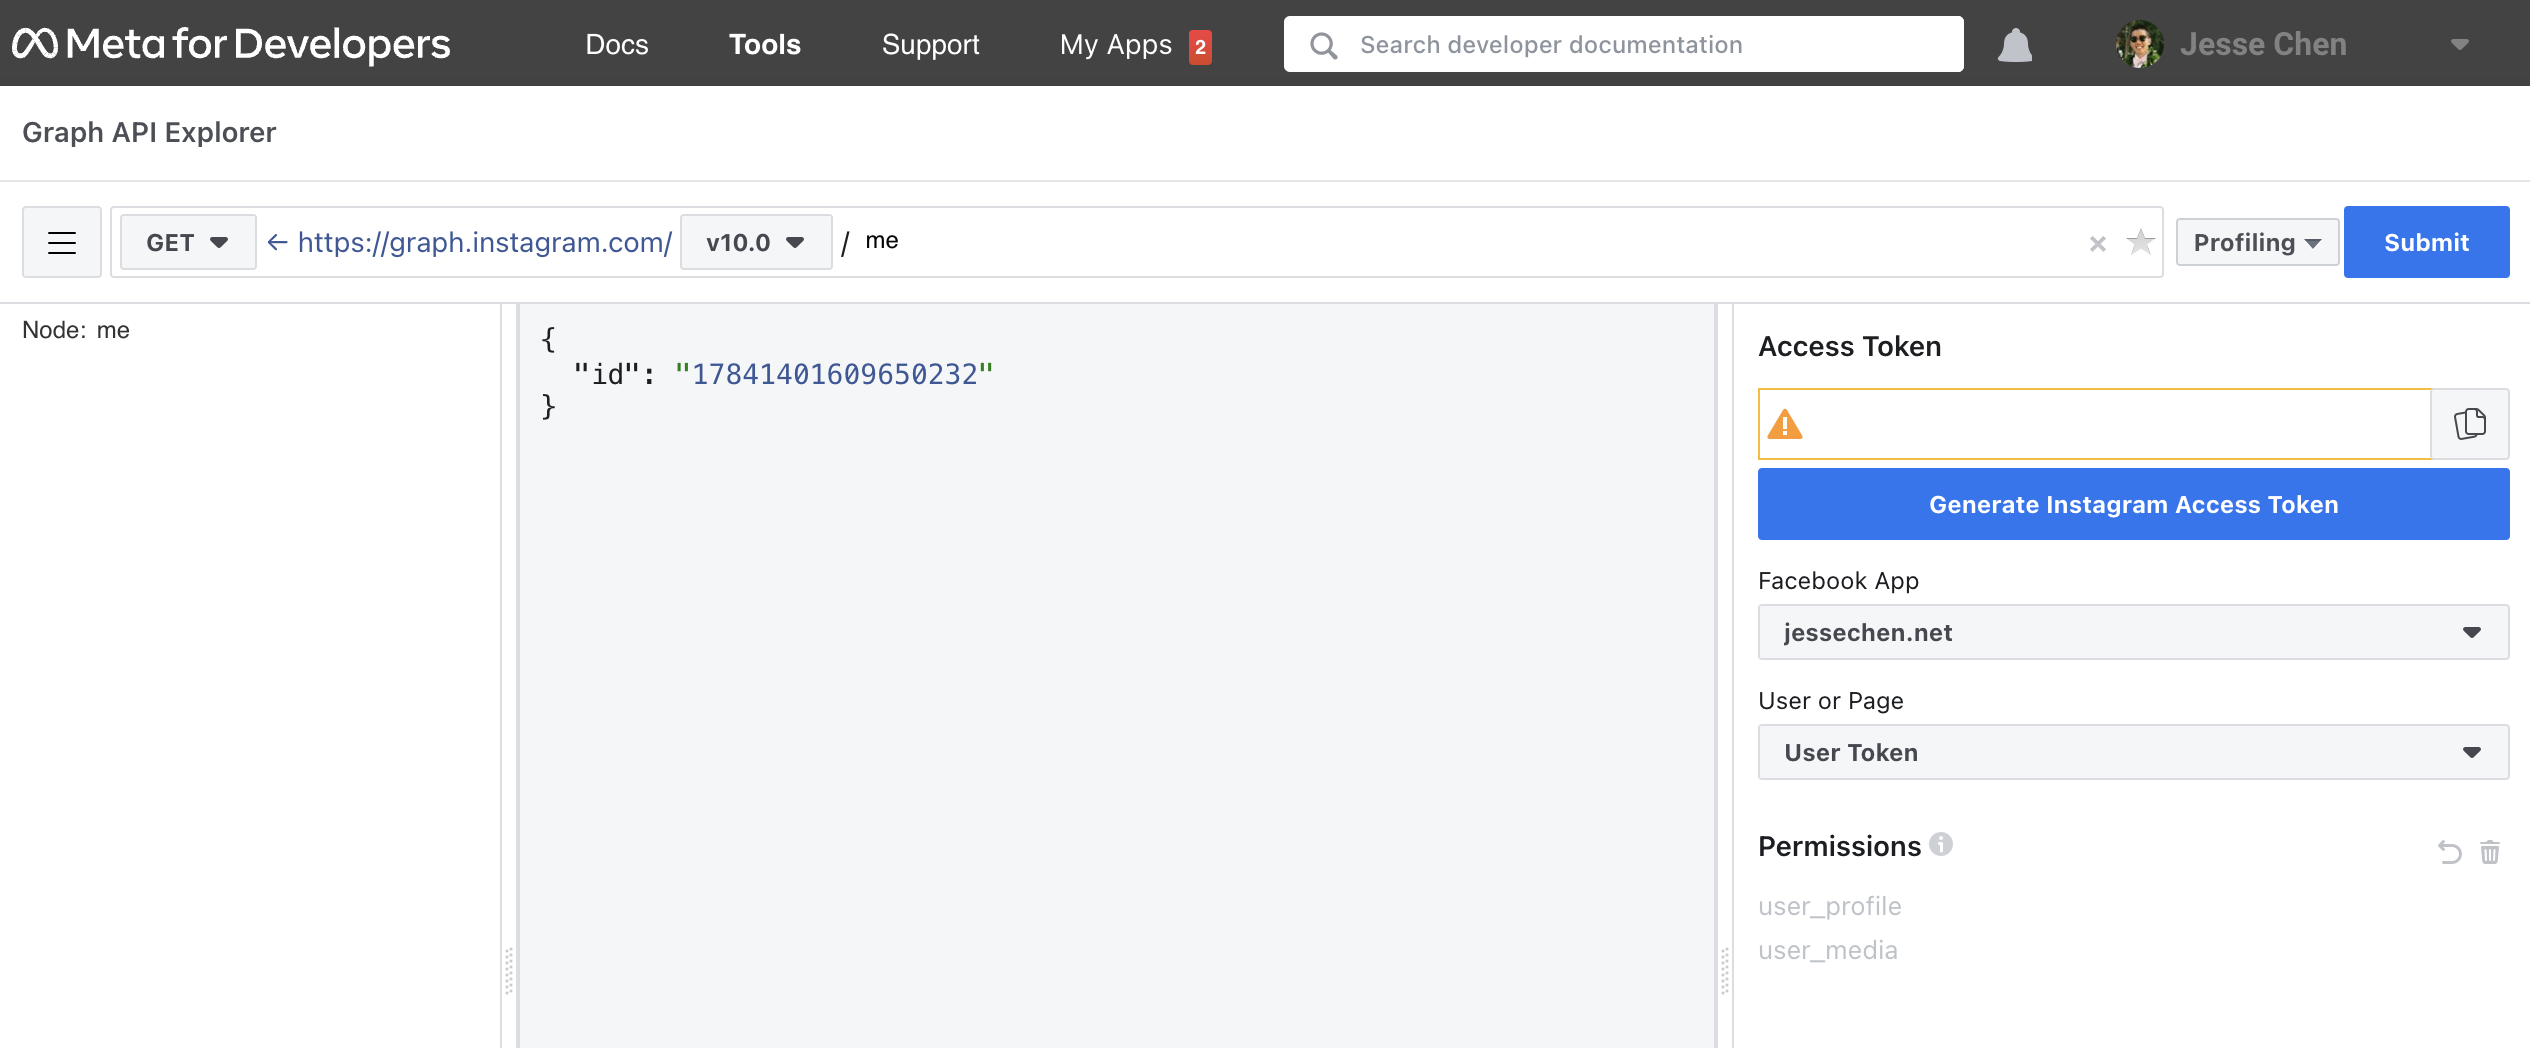
To get your user id, go to the Graph API Explorer, paste in your generated access token and hit /me.
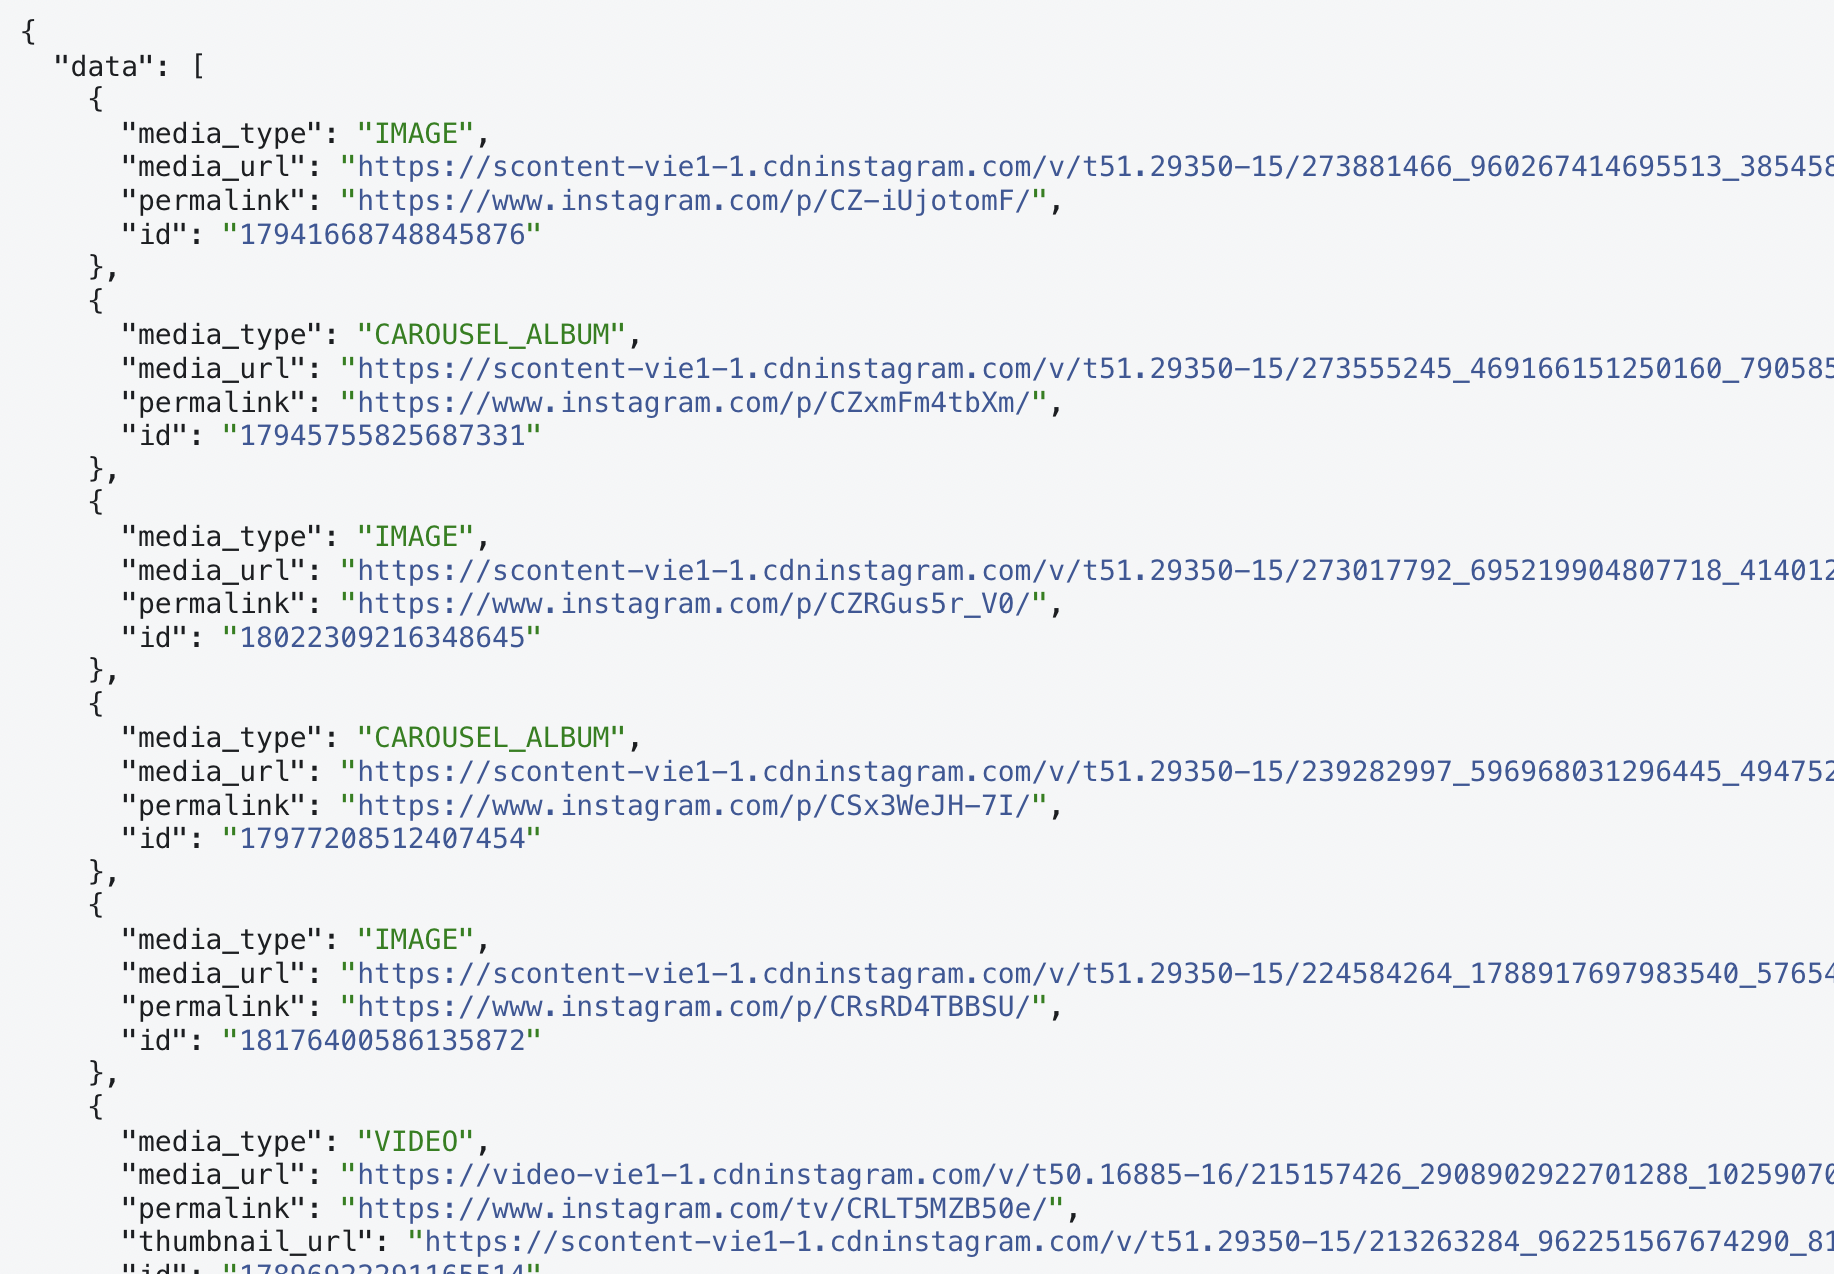
Now hit the /{user_id}/media endpoint again with your user_id and access_token provided. You should see something like:
Success! Now that I can get the latest 9 medias from the official Instagram API, the next step is to ingest the images onto Cloudinary.
Time for a cron job#
Now I need to automate a way to fetch the latest results from the API endpoint and upload any new thumbnails onto Cloudinary. If I have a server, I can run a daily script to hit the Graph API endpoint and see if there are new photos.
If new photos are detected, I can use one of Cloudinary’s many SDKs to upload said photos. I have a Dreamhost plan from when I used to host my old website on there and they support cron jobs so I deployed my scripts to run daily there. But you could use any VPS or hosting service here.
The quick and hacky script does the following:
- Grab the current 9 photos off Cloudinary and index by their id.
- Grab the latest 9 photos off Instagram Graph API and diff the two.
- Delete the stale and outdated photos off Cloudinary.
- Upload the new incoming photos onto Cloudinary.
After I run the script, the 9 photos stored on Cloudinary is synced with my latest Instagram posts. I also have set it up to email me the output of the script so I can monitor if there are any issues.
If you look carefully, you will also notice that I store some additional state into each photo such as media_permalink and media_type, which will make sense later.
Cloudinary Manipulation#
Cloudinary works so well with frontend React applications thanks to their Transformation URL API. You don’t need to set up a complex image backend server to return the right files depending on the client. Instead, construct a dynamic URL in your React code to tell their API what transformation you’d like to perform. Cloudinary will construct the image on-the-fly and cache it for future requests.
For a performative Instagram photo grid, I need thumbnails that are heavily optimized with respect to quality and size. I will use the Transformation URL API to manipulate the original media URLs I got from the Graph API to get what I need. Here’s an example of the turtle thumbnail that is currently on my website:
Open this URL on your browser and try tweaking the URL parameters. Try replacing c_fill to c_scale. Change w_181 to w_120. Or change dpr_2 to dpr_1. Pretty neat, right?
Let’s break down what I’m doing here:
const imgSrc = `/image/upload/f_auto,c_fill,w_181,h_181,dpr_${window.devicePixelRatio}/${media.public_id}`
f_auto: Automatically generates (if needed) and delivers an asset in the most optimal format for the requesting browser in order to minimize the file size. E.g. WebP, AVIFc_fill: Creates an asset with the exact specified width and height without distorting the asset. This option scales as much as needed to at least fill both of the specified dimensions.w_181andh_181: Sets the width and height of the asset.dpr_${window.devicePixelRatio}: Sets the device pixel ratio (DPR) for the delivered image or video using a specified value or automatically based on the requesting device.window.devicePixelRatiois the JS global variable to fetch the pixel ratio of the browser.
I am now able to transform the original way-too-large images from the Graph API into bite-sized thumbnails that is ready to be rendered in NextJS/Chakra. Compare the image size from the Instagram Graph API vs Cloudinary after applying these transformations.
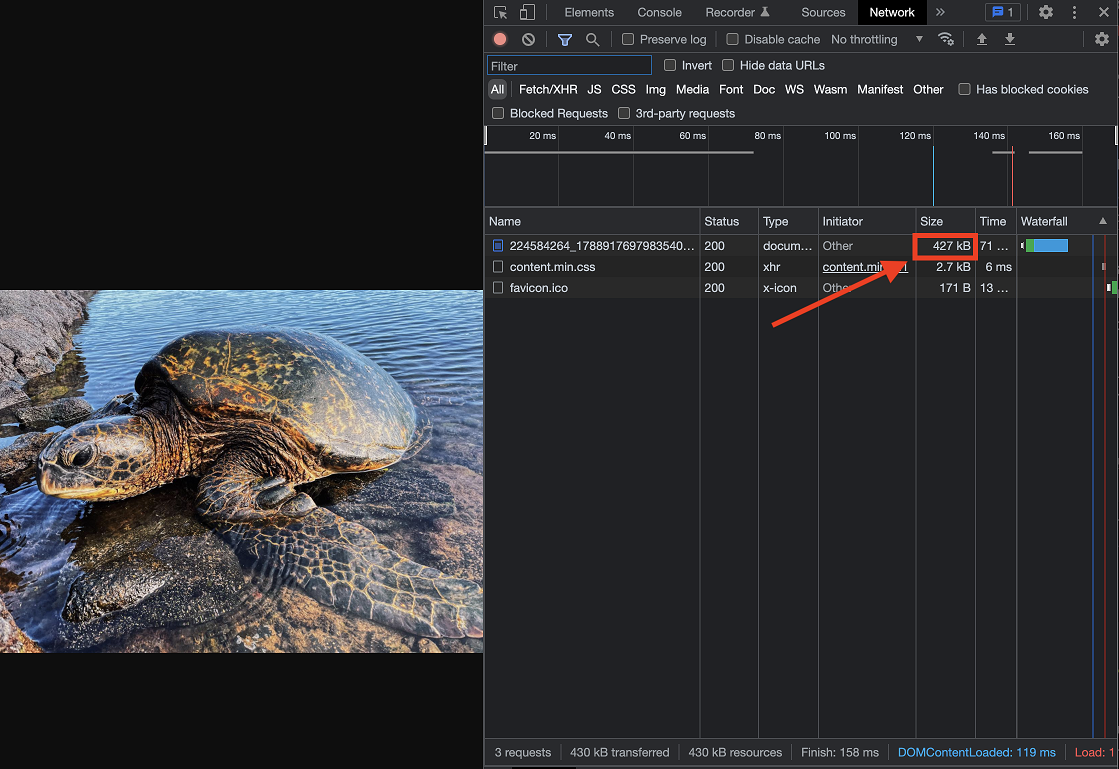
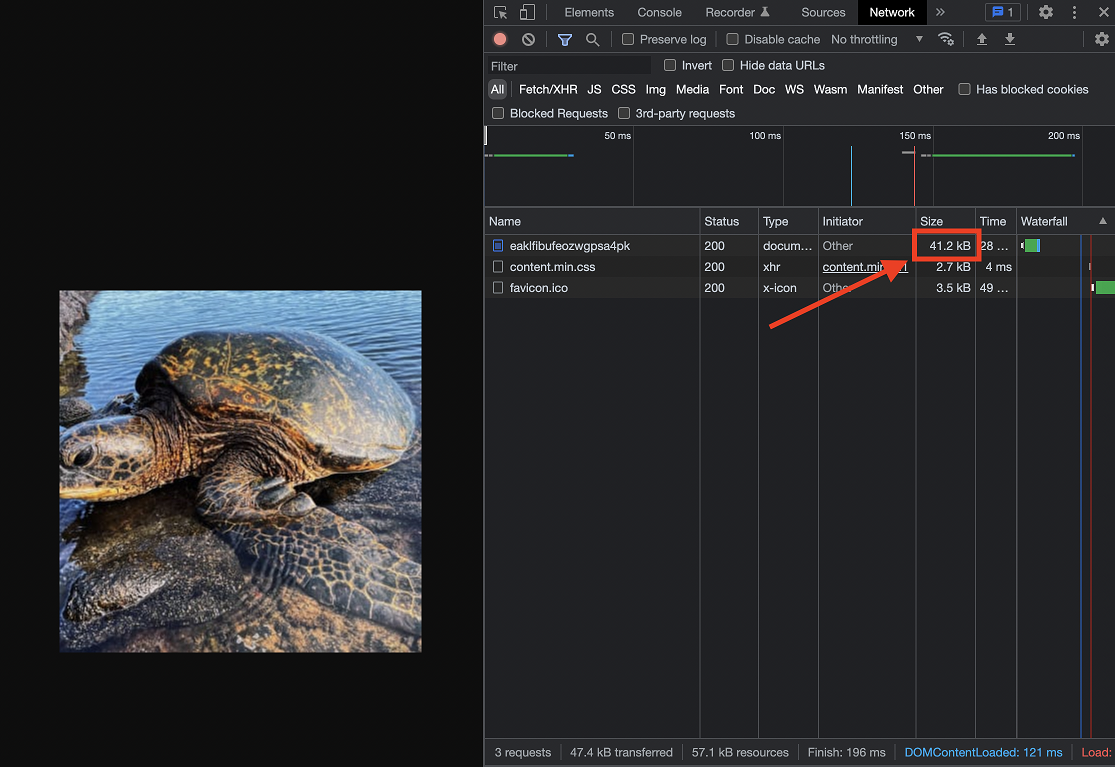
A 10x improvement!! I was able to considerably save the amount of data sent over the wire by returning the best minimum quality/size necessary for a small thumbnail.
Moving down to the frontend data layer#

In NextJS, getStaticProps is used to fetch data at build time for a given webpage. The benefit of fetching data at build time is that the data needed to render the page can be pre-computed — meaning this webpage can be statically generated (i.e. fast loading time). The downside is that the data is, well, static. The data will only be up-to-date based on the time the last build was pushed.
This won’t work for our use case! The photo grid is not static data, the thumbnails are updated every 24 hours. Well, luckily NextJS has a solution for you! Incremental Static Regeneration (ISR) is a super cool feature that lets you update static pages after-the-fact. ISR lets you have the best of both worlds: build static webpages for faster load times while handling dynamic data. Mind. Blown. 🤯
Let’s check out the getStaticProps function for my home page:
export async function getStaticProps() {
  cloudinary.config({
    cloud_name: process.env.CLOUDINARY_CLOUD_NAME,
    api_key: process.env.CLOUDINARY_API_KEY,
    api_secret: process.env.CLOUDINARY_API_SECRET,
    secure: true,
  })

  const igMedias = []
  try {
    const result = await cloudinary.v2.search
      .expression("folder:instagram/*")
      .with_field("context")
      .sort_by("created_at", "desc")
      .max_results("9")
      .execute()

    if (result) {
      result.resources.forEach((resource) =>
        igMedias.push({
          public_id: resource.public_id,
          permalink: resource.context.media_permalink,
          media_type: resource.context.media_type,
          id: resource.context.id,
        }),
      )
    }
  } catch (e) {
    console.error(e)
  }

  return {
    props: {
      igMedias,
    },
    revalidate: 3600, // 1 day
  }
}
The code is relatively straightforward. I connect to Cloudinary and fetch the last 9 photos so I can massage the data into a JS array. I pass igMedias as a prop for my home page so my UI component can render the photo grid. revalidate is what allows ISR to do its magic and trigger a regeneration of the static data at the appropriate frequency.
Final destination#
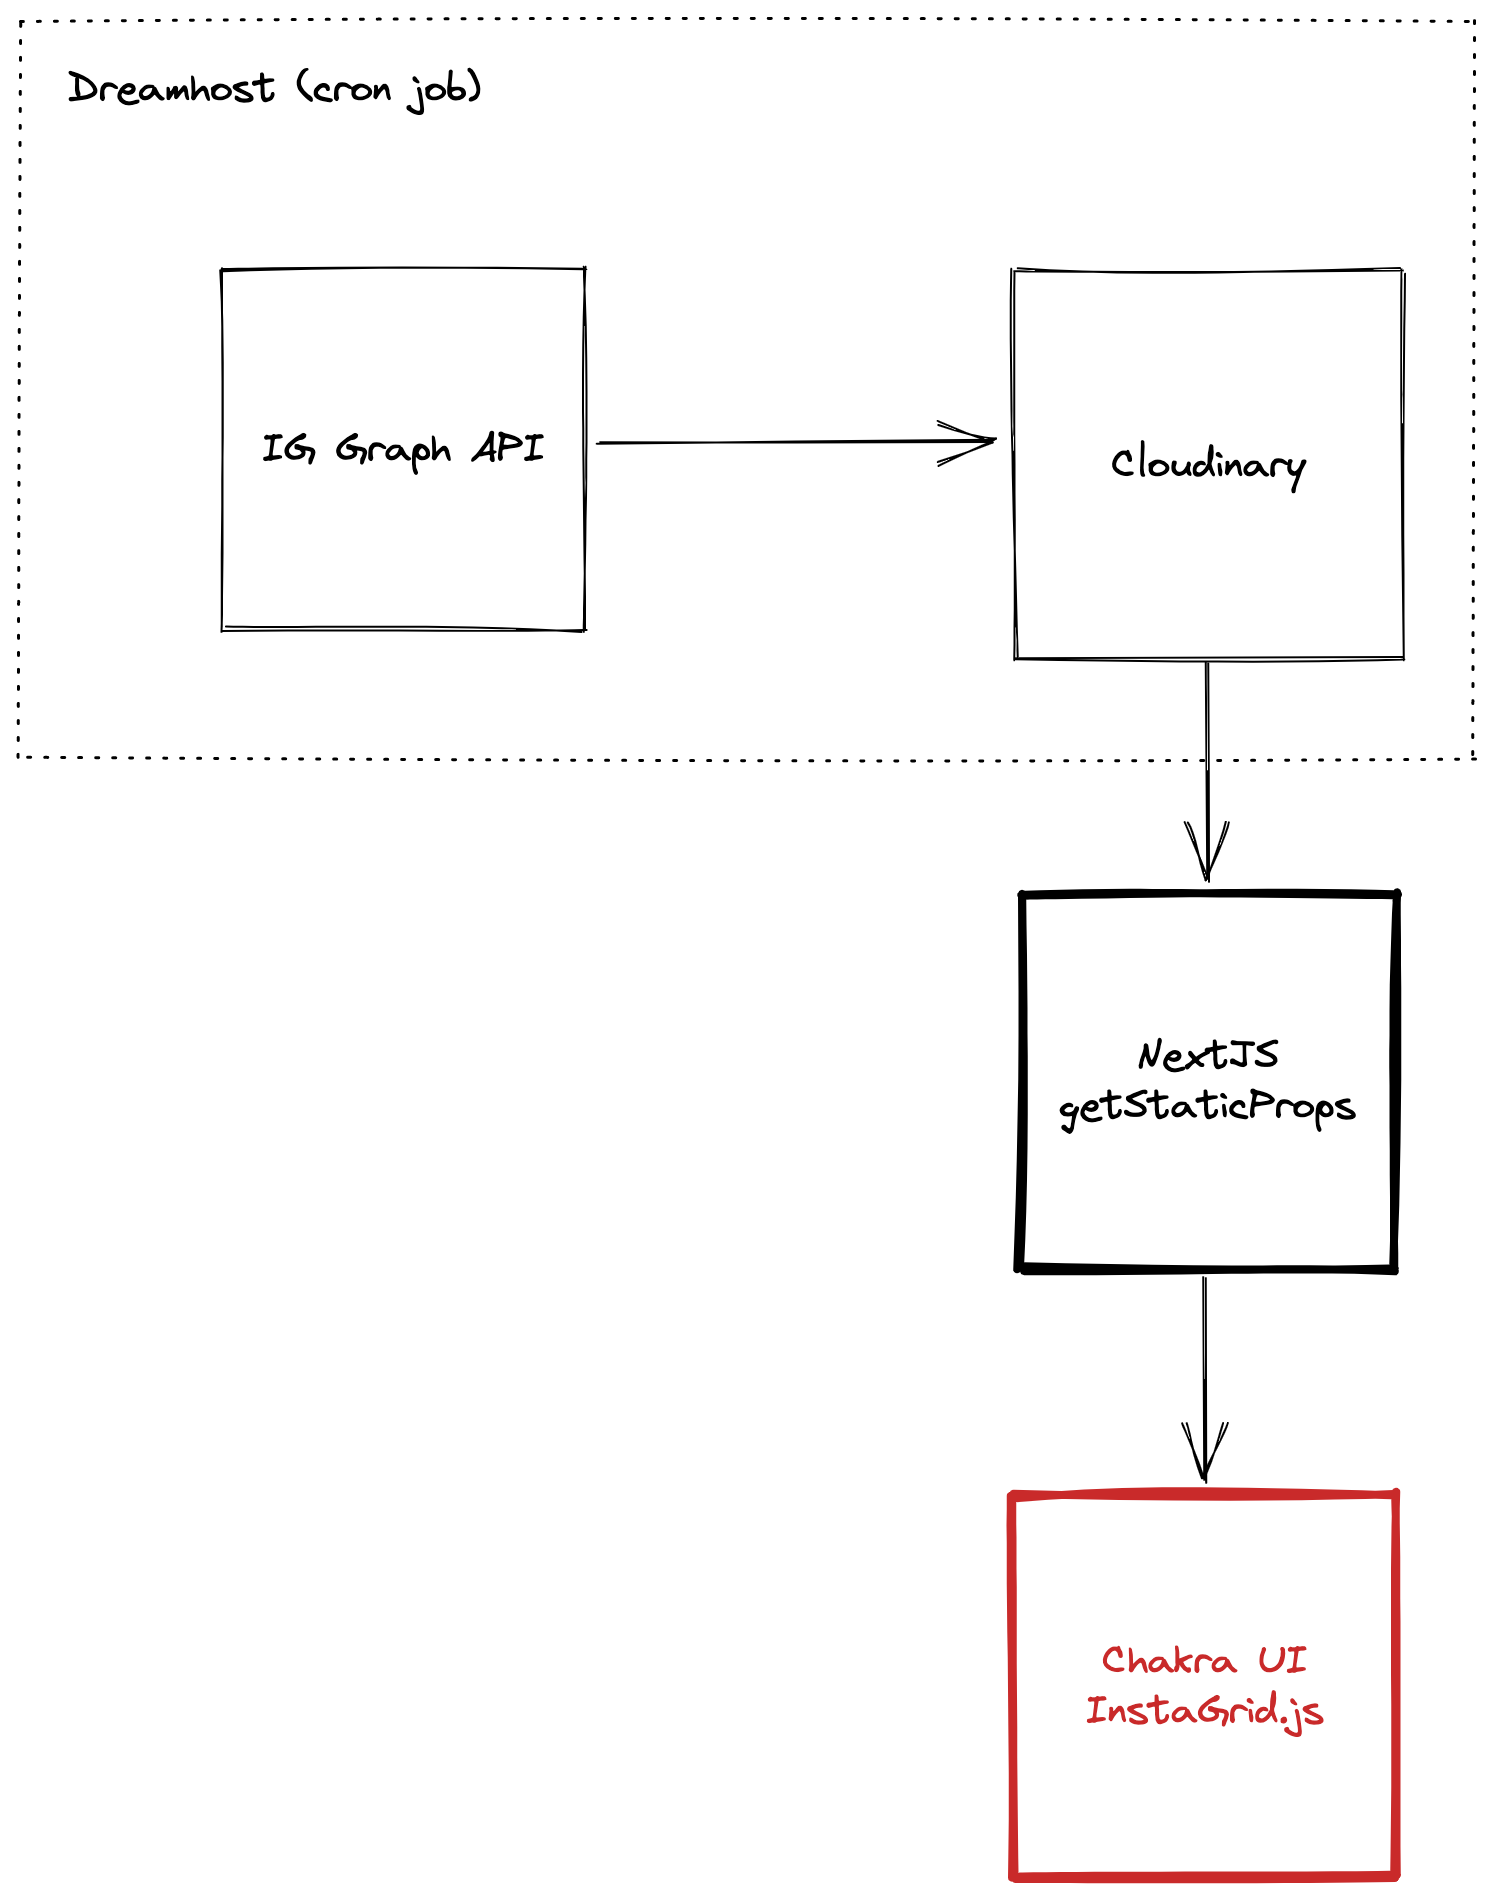
We are finally at the end. We have clean and sanitized bite-sized thumbnails served in a simple JS array object for our Chakra UI component to do the final job of rendering. Introducing InstaGrid.js, my homebrew solution to render a performative Instagram photo grid.
Chakra UI is so so good. I have tried Material UI and Bootstrap but the best React UI framework is Chakra by far. Their thorough documentation, robust component library, and logical APIs makes it so fun to work with. I cannot recommend them enough. Even if you’re not familiar with Chakra, I bet you can read the code below and get a general sense of how it works.
import { AspectRatio, LinkOverlay, SimpleGrid } from "@chakra-ui/layout"
import { Icon } from "@chakra-ui/react"
import { FaPlay } from "react-icons/fa"
import NImage from "next/image"

export default function InstaGrid({ medias, ...props }) {
  if (!medias) {
    return null
  }

  return (
    <SimpleGrid {...props} columns={[2, 3]} spacing="4">
      {medias.map((media) => {
        const isVideo = media.media_type === "VIDEO"
        const imgSrc = `/image/upload/f_auto,c_fill,w_181,h_181,dpr_${window.devicePixelRatio}/${media.public_id}`

        return (
          <LinkOverlay
            className="umami--click--instagram_grid"
            isExternal
            href={media.permalink}
            key={media.id}
            position="relative"
            css={
              isVideo
                ? {
                    "& svg": {
                      position: "absolute",
                      top: "50%",
                      left: "50%",
                      transform: "translate(-50%, -50%)",
                    },
                  }
                : {}
            }>
            <AspectRatio ratio="1">
              <NImage layout="fill" src={imgSrc} alt="Instagram photo" />
            </AspectRatio>
            {isVideo ? <Icon as={FaPlay} boxSize="6" /> : null}
          </LinkOverlay>
        )
      })}
    </SimpleGrid>
  )
}
Remember how I mentioned my cron job stored additional state into each photo? This is where it becomes useful. I pull the media_type enum to determine whether to overlay a play icon over a video post. The permalink string to link out to Instagram if you click on the thumbnail. id is used as a key for React elements in an array.
This component handles responsive design very well. Chakra UI automatically handles this with the inclusion of columns={[2, 3]} prop. This tells Chakra UI to display the grid in 3 columns if the viewport is tablet-width or greater, 2 columns for anything smaller. AspectRatio enforces the thumbnails to scale with the grid but maintain the square dimensions.
Conclusion#
This concludes the story of how I built the most overkill Instagram photo grid ever. To be sure, there are notable downsides with this implementation. It does not update in realtime, and the amount of external dependencies for this means I might regret this years later if/when things fail or break. But overall, I’m very happy with how fast my home page loads now. My entire website is open source, and so all the code for this component is available on my GitHub.
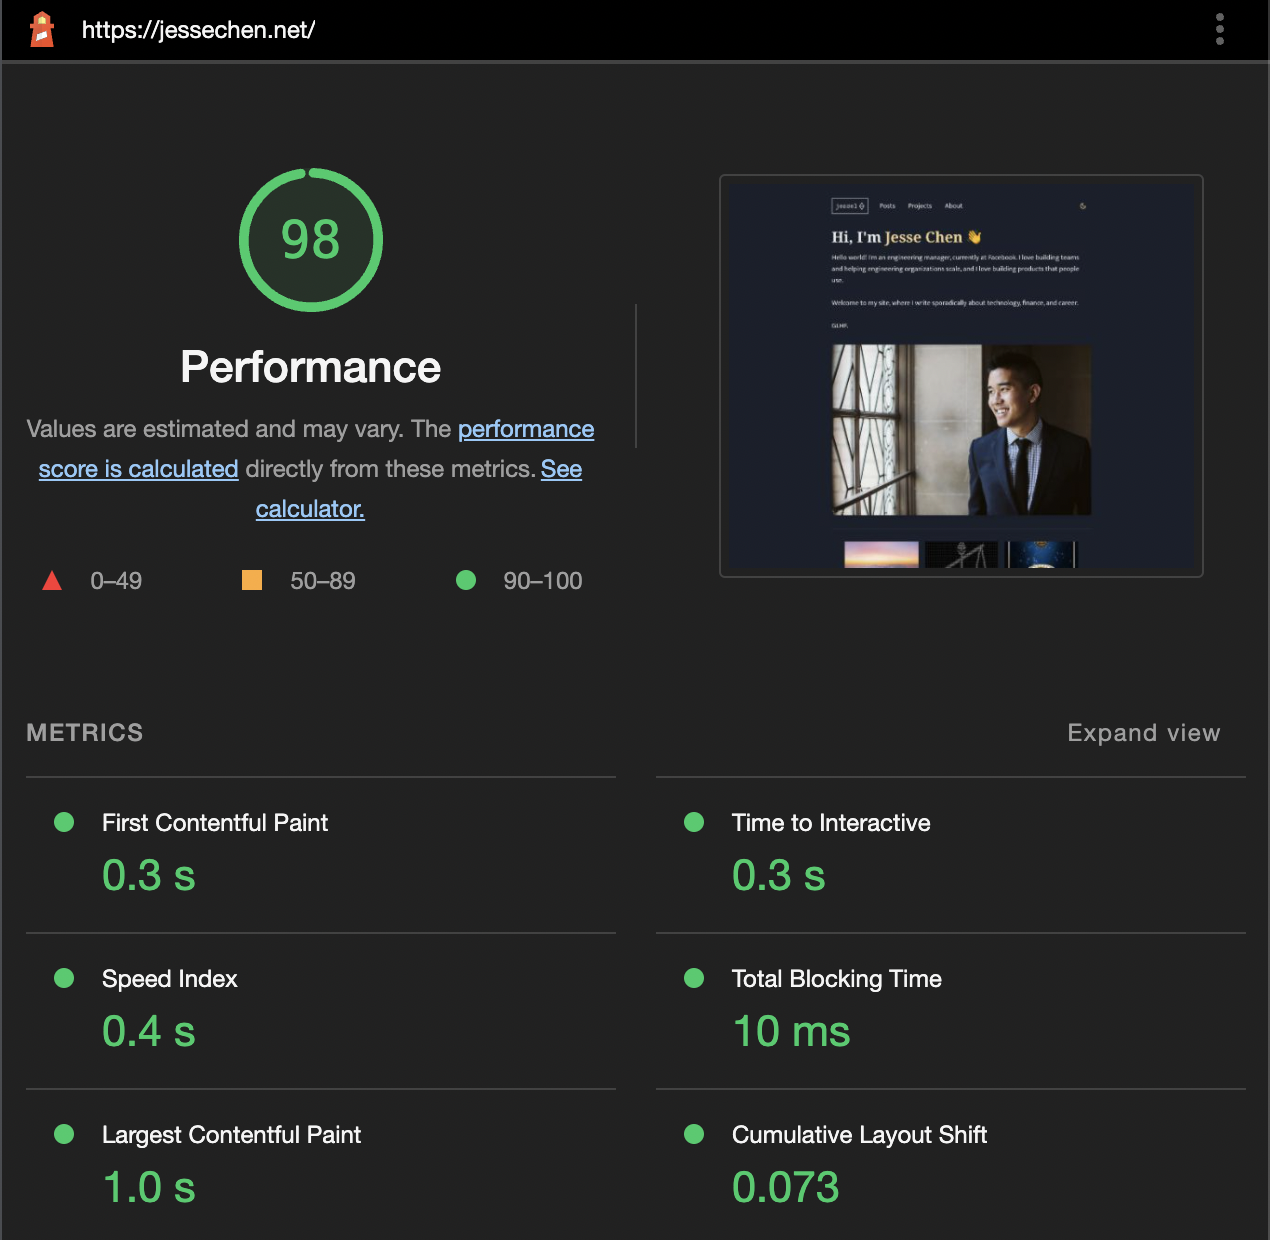
Going from 3.2MB to 700kB for my home page was a huge 80% reduction in payload size and it was so worth it. Clicking around on my website now feels snappy and fast. Having not coded for more then half a decade since switching to EM, I felt like hackerman when this worked. As an ex-engineer on the Photos team at Facebook, I hope this is somewhat making my younger IC self proud 🥲.
© 2024, Jesse Chen • d3be7b1